
Overview
Publisher OAuth lets your users sign in with your account system. Cashmere then gives them the collections that your system says they can read. Use it when users already license your content on your own platform.
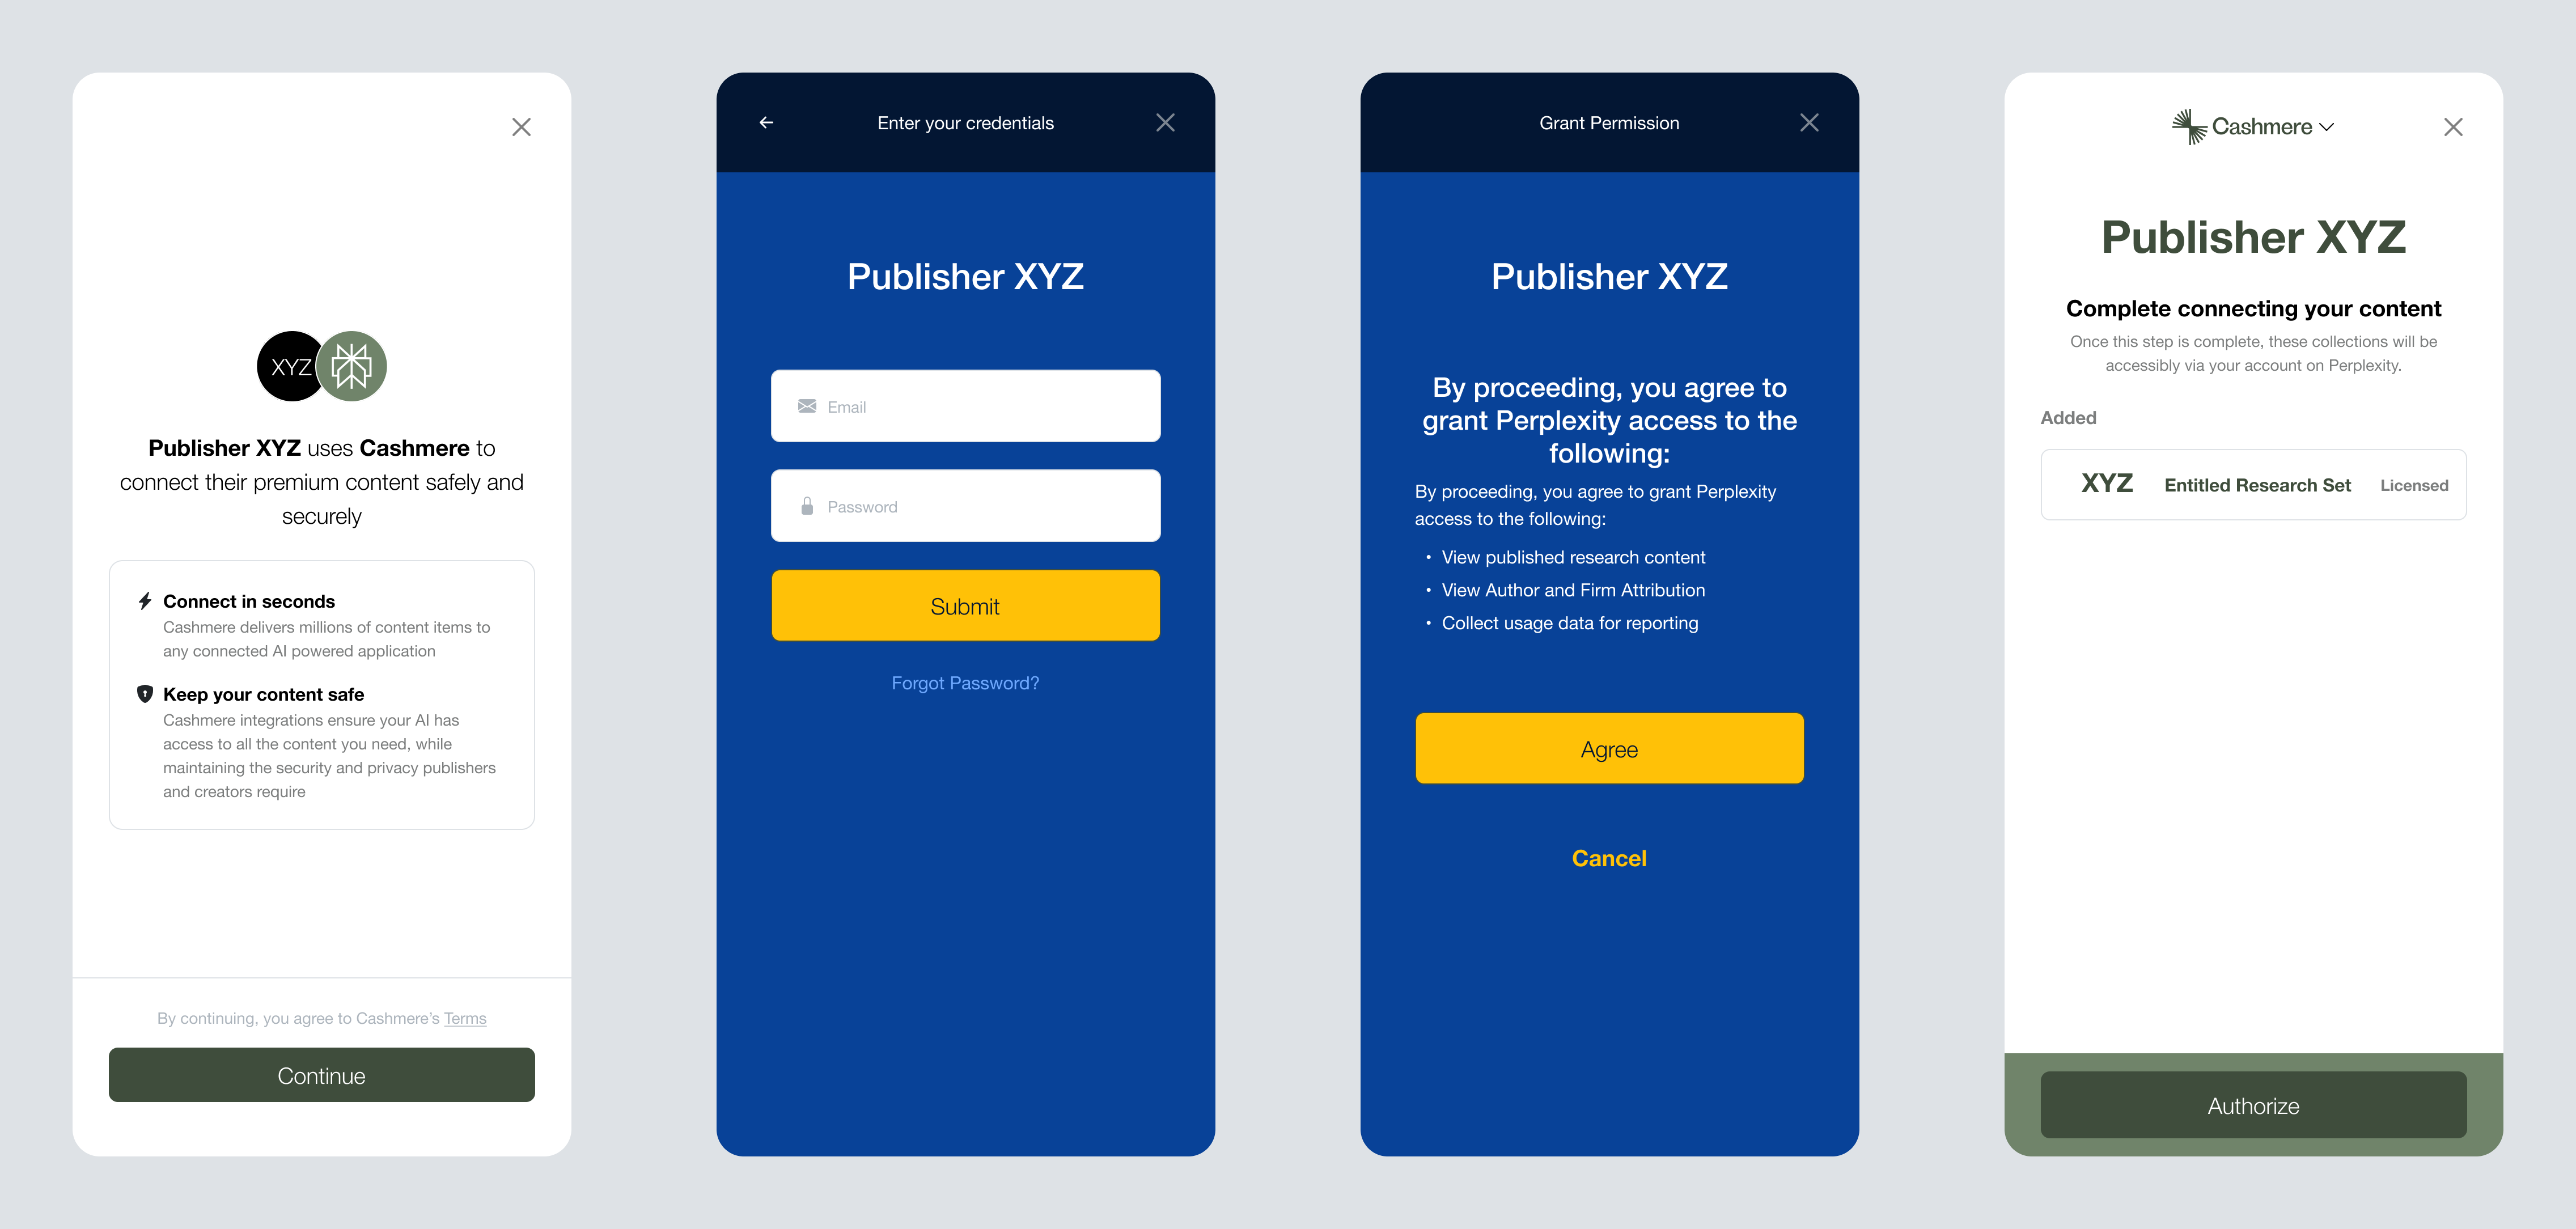
This image visualizes the flow of how your integration would work. In the first Image, Cashmere Link notifies the user that a 3rd party is facilitating the connection. The second and third images are intended to represent your auth flow. In the last image, when the token and the scopes have been returned to Cashmere, we present it back to the user and confirm the authentication process.
What This Integration Provides
- Single Sign-On: Users authenticate once with your system to access licensed content
- Automatic Collection Access: Content collections are automatically available based on user permissions
- Seamless User Experience: No additional account creation or manual license management required
- Dynamic Access Control: Collection access updates automatically when user permissions change
- MCP Servers and Cashmere Link: The same provider works for both
Your Role as Publisher
As a publisher, you will:
- Configure your OAuth provider with specific requirements
- Implement custom OAuth claims to communicate collection access rights
- Provide configuration details to Cashmere for integration
- Test the integration before going live
Step 1: OAuth Provider Configuration
1.1 Create OAuth Application
In your OAuth provider (Auth0, Okta, custom implementation, etc.), create a new web application with these specifications:
Required Settings:
- Application Type: Web Application or Single Page Application
- Grant Types:
- Authorization Code with PKCE (required)
- Refresh Token (recommended for seamless experience, required to update users continually)
- Token Endpoint Authentication: Client Secret Basic or Client Secret Post
Required Scopes:
Your OAuth application must support these scopes:
openid- Standard OpenID Connect scopeemail- User email address (required for account matching)offline_access- Refresh token support (required for Cashmere to check user access later)https://cashmere.io/collection_ids- Custom scope for collection access
1.2 Configure Redirect URI
Set your OAuth application's redirect URI to:
https://cashmere.io/publisher_oauth/callback
Important: The redirect URI must match exactly. Contact Cashmere if you need a different domain or custom redirect URL.
1.3 Note Your OAuth Endpoints
You'll need to provide these details to Cashmere:
- Authorization URL: Where users are redirected to authenticate
- Token URL: Where authorization codes are exchanged for tokens
- Client ID: Your OAuth application's public identifier
- Client Secret: Your OAuth application's private key (share securely with Cashmere)
Step 2: Implement Custom Claims
2.1 Collection IDs Claim
The most critical part of the integration is implementing the https://cashmere.io/collection_ids custom claim. This claim tells Cashmere which content collections a user has access to. Cashmere validates passed collection ids to ensure you are the owner of them.
Claim Requirements:
- Claim Name: Must be exactly
https://cashmere.io/collection_ids - Token Location: Must be included in the ID token
- Format: Comma-separated string of collection IDs
- Example:
"1,5,10,15"(user has access to collections 1, 5, 10, and 15)
Implementation Examples:
Auth0 Post Login Trigger:
exports.onExecutePostLogin = async (event, api) => {
  if (event.transaction?.requested_scopes?.includes("https://cashmere.io/collection_ids")) {
    // Determine user's collection access based on your business logic
    const userCollections = getUserCollections(event.user.user_id);
    api.idToken.setCustomClaim(
      "https://cashmere.io/collection_ids",
      userCollections.join(',')  // eg "1,2,3"
    );
  }
};
2.2 Business Logic for Collection Access
You need to implement logic to determine which collections a user can access. This typically involves:
- User Role Mapping: Map user roles/groups to collection IDs
- Subscription Status: Check active subscriptions or licenses
- Dynamic Permissions: Query your database for user-specific access rights
- Organizational Access: Include collections based on user's organization/department
It also might be as simple as a hard-coded list if you are granting all of your users access to a set list of collections.
Example Business Logic:
function getUserCollections(userId) {
  const user = getUserFromDatabase(userId);
  const collections = [];

  // Add collections based on subscription tier
  if (user.subscription === 'premium') {
    collections.push(1, 2, 3, 4, 5); // Premium collections
  } else if (user.subscription === 'basic') {
    collections.push(1, 2); // Basic collections only
  }

  // Add organization-specific collections
  if (user.organization === 'university_a') {
    collections.push(10, 11, 12); // University A collections
  }

  return collections;
}
2.3 Access Updates
Your implementation should support dynamic access changes. Cashmere will update the collections list via an OAuth token refresh after each API Token each time it is used.
Step 3: Coordinate with Cashmere
3.1 Information to Provide
Contact Cashmere with the following information:
OAuth Configuration:
- Authorization URL:
https://your-provider.com/oauth/authorize - Token URL:
https://your-provider.com/oauth/token - Client ID: Your OAuth application's client ID
- Client Secret: Your OAuth application's client secret
- Email: Your Cashmere account email address so we can associate the OAuth provider credentials
You will receive a unique identifier which you will be able to test the connection with via
https://cashmere.io/publisher_oauth/<publisher_provider_uuid>
Step 4: Testing Your OAuth Provider Setup
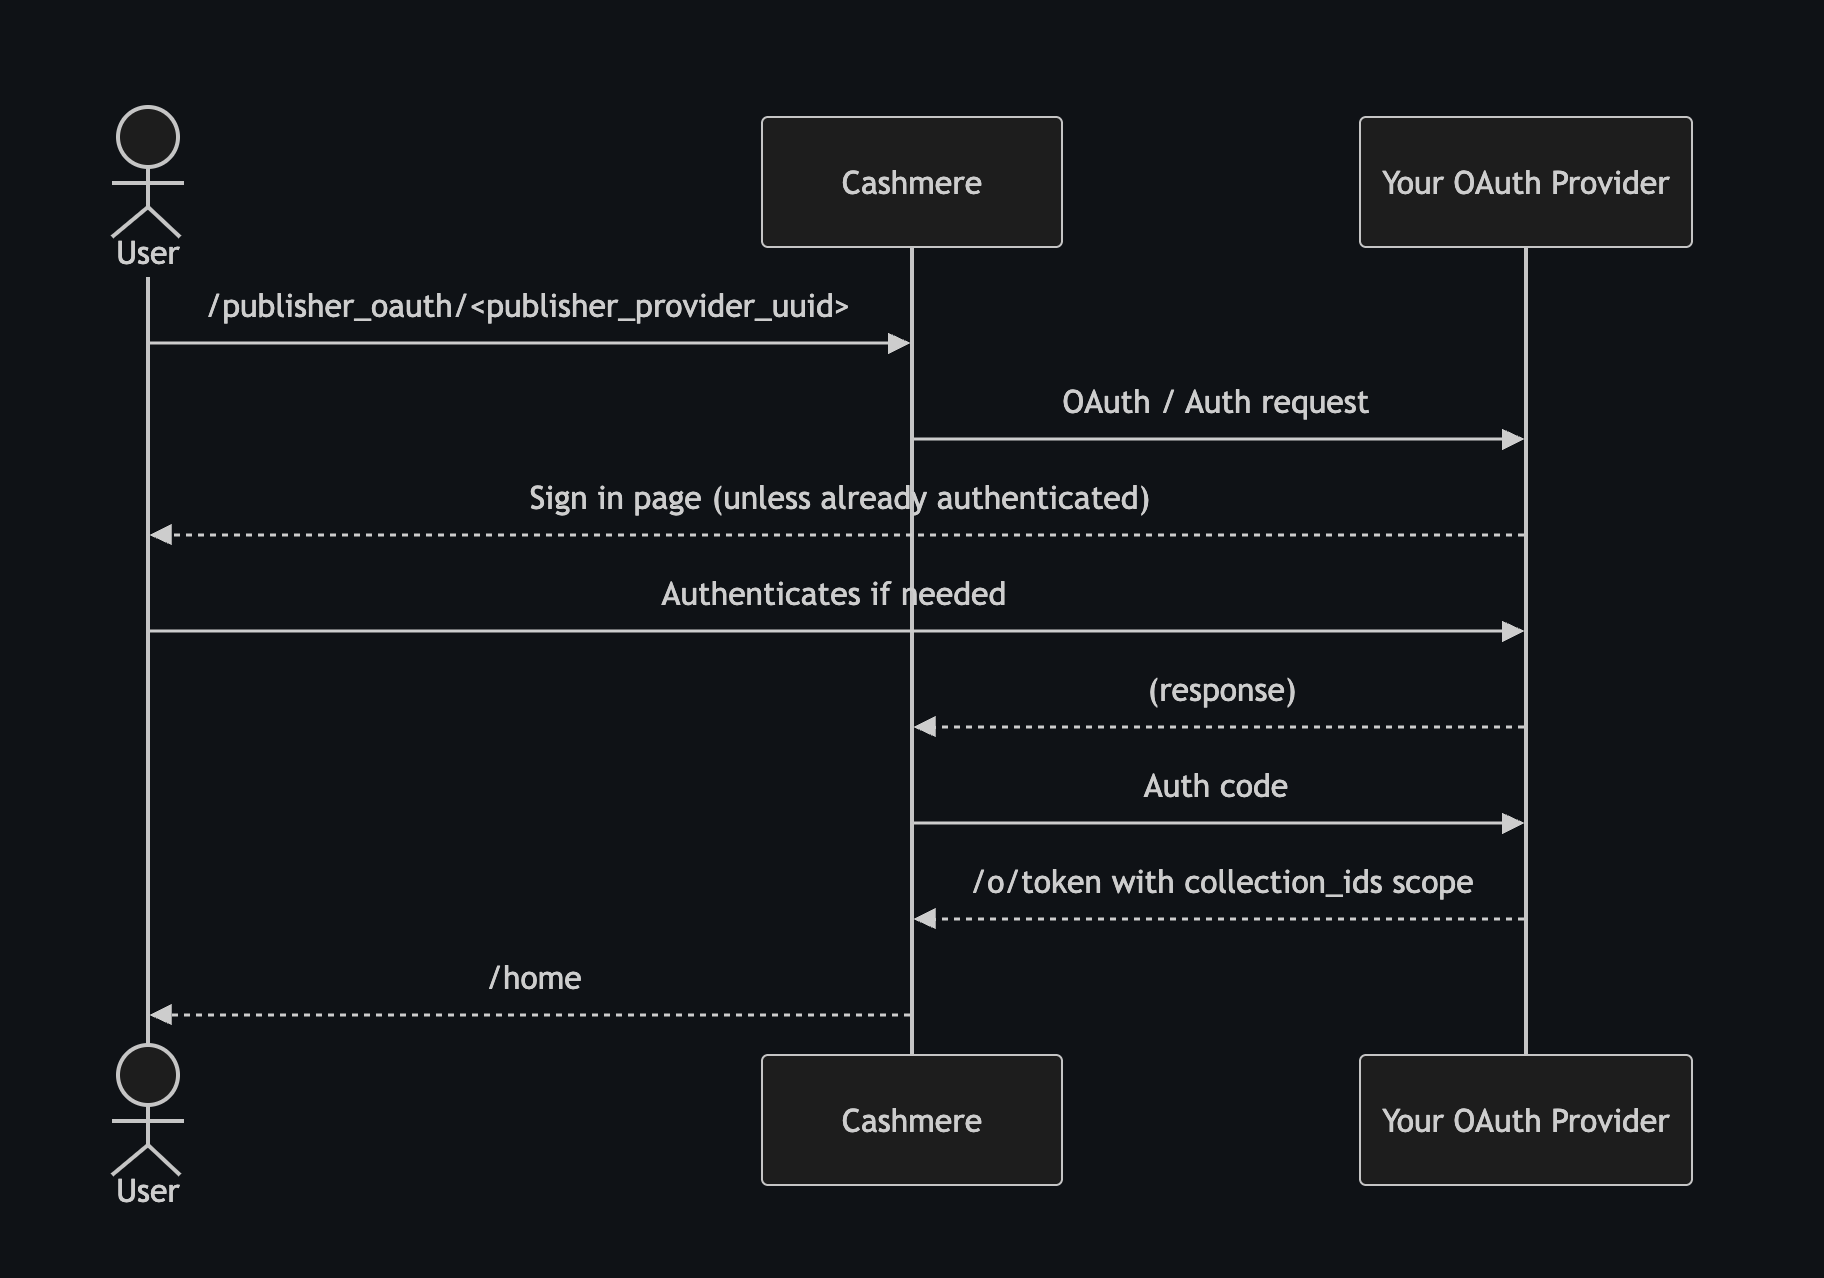
4.1 OAuth Flow Testing
- Authorization Flow: Verify users can authenticate successfully
- Token Exchange: Confirm authorization codes exchange for valid tokens
- Custom Claims: Check that collection IDs appear in id tokens
- Token Refresh: Test that refresh tokens work properly
Step 5: Use Publisher OAuth
After Cashmere sets up your provider, you can use it in two ways.
With an MCP server. In the MCP server wizard, go to the Authentication step. Set Authentication type to Publisher OAuth, and select your provider. When a user connects the server in Claude or ChatGPT, they sign in with your account system. Their connection reads only the collections in your collection_ids claim.
With Cashmere Link. To issue API keys in your own app, follow Short Link Mode.